- What is Google Tag Manager?
- How To Use The Element Visibility Trigger For Form Tracking
- How to Track Multiple Page Forms with Trigger Groups
- What JavaScript should you know for Google Tag Manager?
- How to Create A Google Tag Manager Template
- How to Use RegEx In Google Tag Manager
After starting a new job in the digital marketing world, a world I had never been part of, I was introduced to a plethora of tools. These were tools I had never ever heard of, let alone know how to use. It included tools that form part of the Google Suite, like Google Tag Manager, Google Search Console and actually learning how to use Google Analytics.
Part of learning about Google Analytics, was learning about conversion tracking and having to set up events, goals and conversions for client’s websites with Google Tag Manager. I learnt lessons in overcoming obstacles such as, what to do when a page reloads after submitting a form and displays a thank you message on the same URL.
Another part was learning about how to implement schema markup using Google Tag Manager, and how to do it at scale, for thousands of product pages across many product categories.
So, what exactly is this blog post about? As the title says, it’s Five Google Tag Manager tips for beginners of the digital marketing world. It’s a couple of tips and tricks I learnt that helped me overcome obstacles, how to scale and automate implementation of various tasks using Google Tag Manager.
Let’s dive into one of my favourite tools!
What is Google Tag Manager?
Google Tag Manager is a free tool, part of Google’s Marketing Platform, that allows people with little to no developer skills implement marketing code, or any snippets of javascript code, on a website without having to edit any part of the website’s code.
I would assume that if you’re reading this you know what Google Tag Manager is, what tags, triggers and variables are, and have it already installed on yours or a client’s website.
If you don’t know what those are, consider reading What is Google Tag Manager and why use it? The truth about Google Tag Manager by Amanda Gant at Orbit Media.
How to Use The Element Visibility Trigger For Form Tracking
This was one of my more recent discoveries and could have saved me many hours, and resulted in more accurate conversion data for our clients.
Using the Element Visibility is particularly valuable when you have a page that reloads with a successful, or unsuccessful, form submission message or email signup, on the same URL as the form.
Firing the tag on a ‘Submit’ button wouldn’t give you accurate conversion data because there might be some unsuccessful clicks and there is no /thank-you/ page after the form is submitted. I believe common WordPress plugins like Contact Form 7, Ninja Forms and MailChimp have this as an option. Kind of like this:
Element Visibility works by waiting for a particular ID or CSS selector to become visible in the loaded HTML before firing the trigger, in this case for the conversion.
How to Setup an Element Visibility Trigger
Step 1: How to Identify the Unique Element
To do this, you’re going to have to submit the form and wait for the successful form submission message to appear.
Inspect the success message
Using the Inspect tool, you should be able to identify a class or an id with a ‘result’ or ‘success’ somewhere in it. This is usually it because, generally, the form doesn’t submit if not completed fully.
It’s often a good idea to have the Inspect tool open before submitting the form to see where there are any changes.
In this case it’s for a newsletter. You can see id=”newsletter-result-block”. This is the element that becomes visible once successfully submitting your email address to a newsletter sign up.

Step 2: Create the Trigger
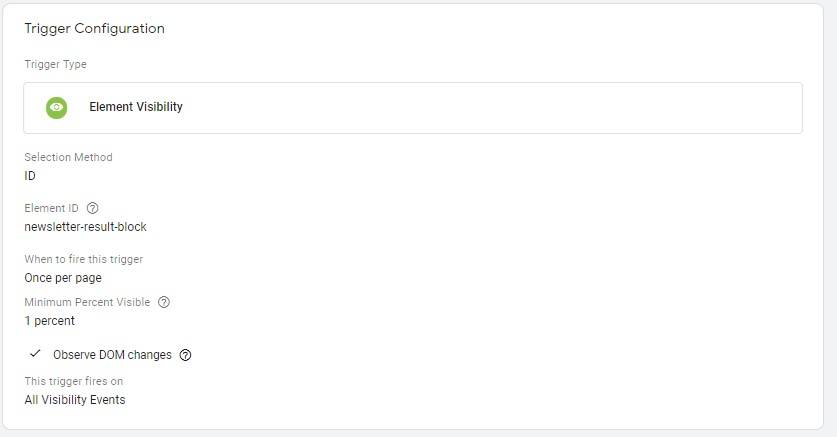
Trigger Type
When creating the trigger in Google Tag Manager, select Element Visibility from the different available trigger types.
Selection Method
Select ID. As we identified in Step 1, we’re using an ID as the unique identifier.
Side note: In this particular case, because we’re using an ID, we don’t need to use the dot format. If you’re using a CSS selector (class) as the Selection Method, you need to use the dot format. This would like like div.newsletter-result-block if it were a class. You can see what the dot format is by opening the Properties sidebar in the Inspect tool.

Element ID
Copy the ID into this section. We only need what is between the inverted commas. In this case it’s newsletter-result-block
When to fire this trigger
We only want to fire this trigger once per page.
Minimum Percent Visible
We only need 1 percent of the element to be visible to fire the trigger.
Observe DOM changes
We always tick Observe DOM changes
This trigger fires on
Because the newsletter sign up is on every page in the footer, we leave this as All Visibility Events
In the end, you should have a trigger that looks similar to this below.
Step 3:Test
Test, test, test. As with any work done in Google Tag Manager, do as many tests as possible to be confident if what you have created work well.
How to Track Multiple Page Forms with Trigger Groups
Trigger Groups are a very useful and relatively new trigger type in terms of Google Tag Manager. What a Trigger Group allows you to do is only fire a tag once all the triggers have fired at least once.
Where I have used it and found it really useful was trying to track an enquiry form with multiple
pages. We were interested in finding out about the drop-off rate on a multiple page form and where potential customers were losing interest.
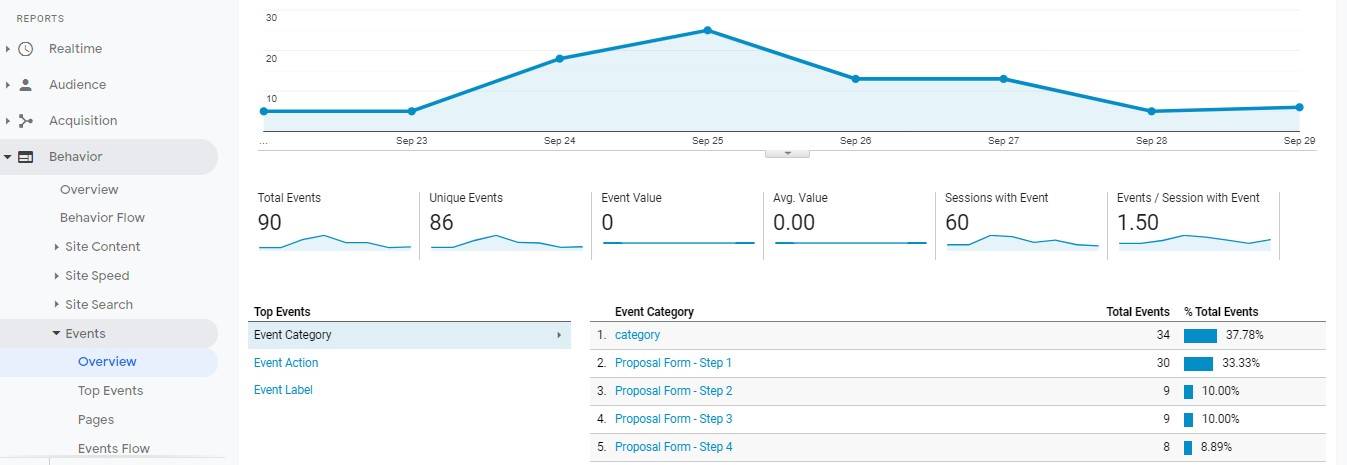
Combining the Trigger Groups with the Element Visibility trigger for when a unique identifier was visible on each page of the form, we were able to quantify where a customer was losing interest. You will be able to find a report of the drop-off rate using the Google Analytics Events report under the Behaviour category.
In this particular instance, in one week, we are able to see that 30 people started entering their details into the Proposal form, and only 8 people made it to the thank-you page. A pretty significant drop-off rate if you ask me!
What does a Trigger Group look like?
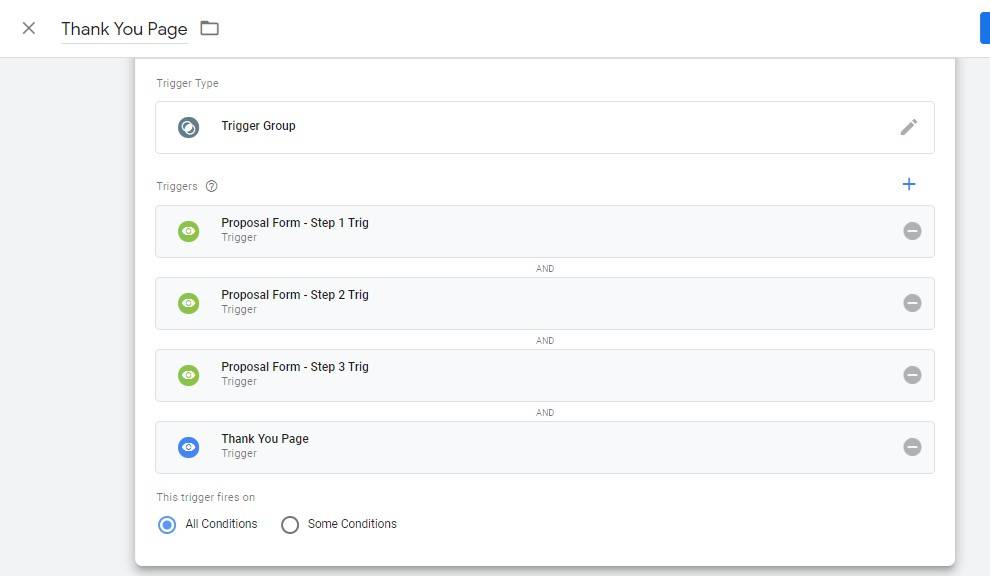
Here we can see that for the Trigger Group to fire, all of these micro-triggers, if you may, must have fired based on the AND conditions.
What JavaScript should you know for Google Tag Manager?
Simo Ahava has a very comprehensive list of little bits of JavaScript that may be useful. You can read more about it here: https://www.simoahava.com/analytics/javascript-101-gtm-part-1/. Considering my severe lack of knowledge of JavaScript and GTM, I will not be writing more about it besides for what is said below.
There are an infinite number of uses for JavaScript in GTM, particularly one that I’m interested in, including A/B testing without expensive software. Measure School did a really simple YouTube video of A/B testing with Google Tag Manager
How to Get An Image URL for Structured Data Markup?
This is my most frequently used JavaScript code that I use in GTM. It is to get image or logo URL as a variable for structured data markup (schema markup).
Using this variable is particularly useful for when trying to markup a product page with Product schema or for the BlogPosting schema types. In most cases all images on a product page, for example, will have the same structure across all the product pages. This means that you only need to figure it out once for that website and you implement it at scale.
Let’s go through the steps.
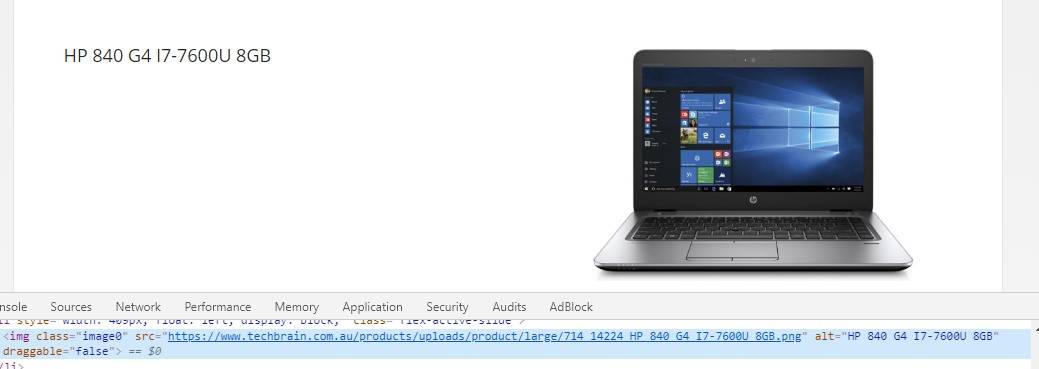
1. Identify what the HTML class is for the image on the product page
Right click on the image to inspect it and it’s code. There you can see the class for this image is class=”image0”
2. Create A User-Defined Variable for the image in GTM
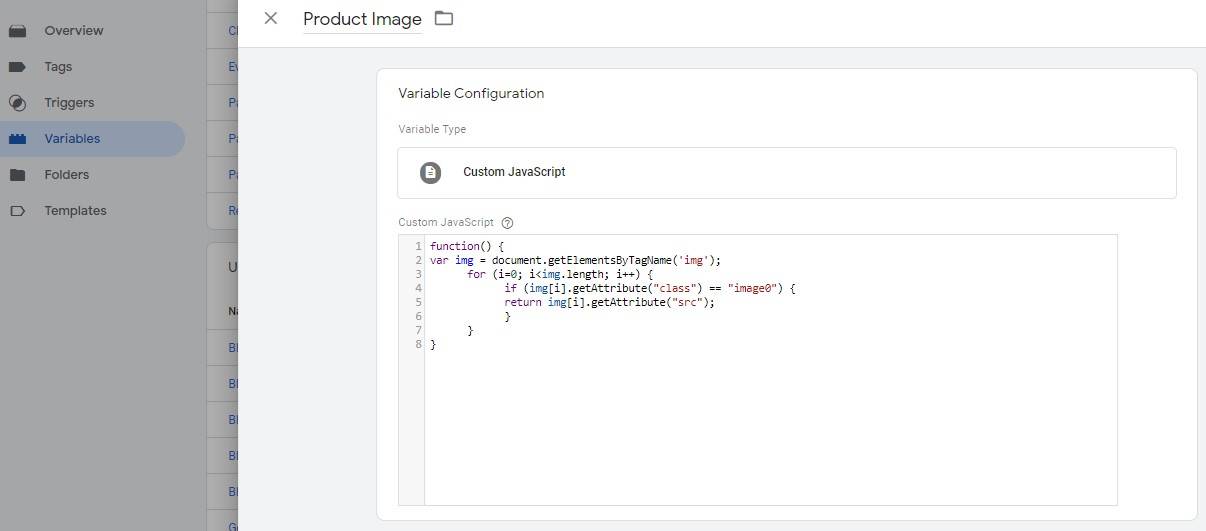
Create a User-Defined Variable called Product Image. Select Custom JavaScript as the variable type. Copy and paste the below code. You will probably have to modify the fourth line of the code to match what the image class is on your website.
| function() {
var img = document.getElementsByTagName(‘img’); for (i=0; i<img.length; i++) { if (img[i].getAttribute(“class”) == “image0”) { return img[i].getAttribute(“src”); } } } |
3. Call the User-Defined Variable
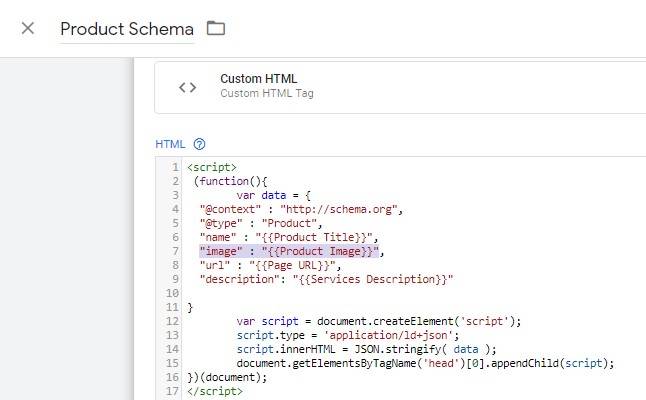
When using the variable in your schema markup, encase the name of the variable in curly brackets as depicted above, like “{{Product Image}}”.
There are many other variables that you should be creating to help scale the implementation of schema. Others include variables that pull in the description of the page, which uses the same code that has been slightly modified. Others include published date, the title or H1 (or any other heading type) and the author’s names, which are all useful for the BlogPosting schema type, particularly for Google’s EAT update.
How to Create A Google Tag Manager Template
When working in an agency, clients are constantly coming on board. For the majority of those clients, you will be having to go through the same setup process for implementing events tracking, using various types of structured data types and creating similar variables across all the new clients.
What if there was a way to do the work once, and scale it across all clients? What if there was a way to templatize all the commonly used Google Tag Manager tags?
Well there is!
How to Import a Google Tag Manager Container?
Getting started on this is a bit of a slow process. Every time you do anything, I mean anything, in a client’s container, you should be duplicating that in a template container you’ve created. This way you will build up a treasure chest of tags, triggers and variables to use in the future.
1. Exporting You Template GTM Container

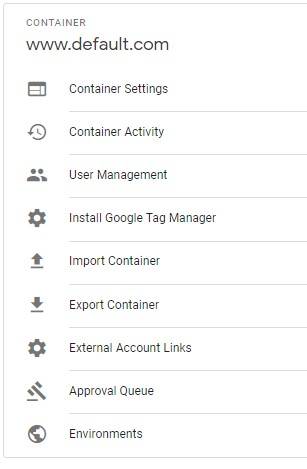
In your template GTM container, in the top left hand corner, click on Admin
2. Click Export Container
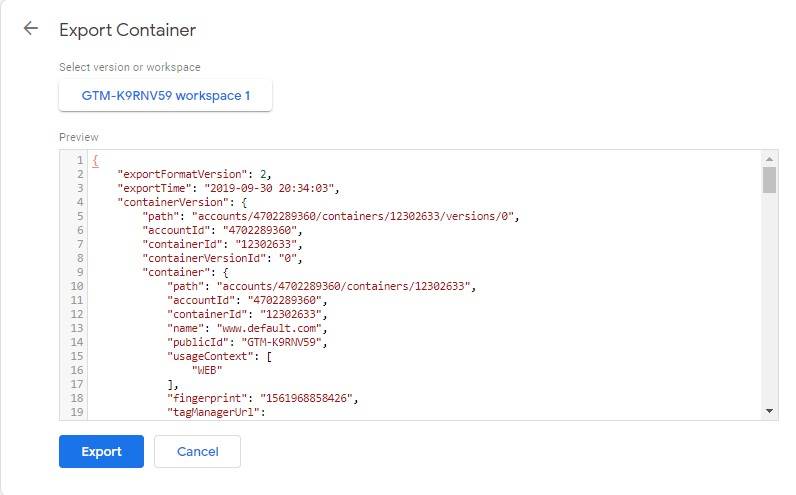
3. Choose the version you want to export

4. Click Export
5. Go to your client’s container
6. Click on admin
7. Click Import Container
8. Choose your template container file
9. Choose your current workspace
10. Select Overwrite if it’s a completely new container
11. Confirm changes
How to use RegEx in Google Tag Manager
Consider this scenario. You have 100 different product categories, each with their own products, where you need to implement a tag on each of the product pages.
You have two options for setting up the tags and triggers.The first is a lot of work and will take a lot of time no matter how you speed it up. Option two is also a lot of work.
- You can create 100 different tags with 100 different triggers (lots of work)
- You can create one tag, with 100 different triggers for each of the products in a different product category using an OR case
Is there a third option that involves learning something new? YES! Enter stage left RegEx.
It’s slightly scary at the beginning, but one line,and a small amount of work in Excel, can solve the trigger option in this scenario.
How to use RegEx for Google Tag Manager Triggers
Step 1: Get the URLs
Use a crawling program, like ScreamingFrog, to get a list of all the product category pages (e.g. https://www.fakewebsite.com/laptops/, https://www.fakewebsite.com/hand-bags/
Step 2: Split the URLs
You only want the URI (the last bit of the URL)
To do this, you need to copy all the URLs into Excel and remove everything before the first forward slash (/) and remove the last forward slash (/). You can do this with a find and replace for https://www.fakewebsite.com to be replaced with nothing. You should be left with /laptops
Step 3:
In this scenario, you want to use the Excel function Concatenate to join ^ to the front of what you have left in Step 2. You result should be ^/laptops.
Step 4:
Using the same Concatenate function, add /| to the end of your Step 3 result. You should be left with ^/laptops/|
In this scenario, you want to be implementing the tag on product pages that contain the category /laptops/, but not on the /laptops/ category page. Add the characters above for the RegEx script will result in the trigger firing on just the actual product pages, and not the category pages. Consider this as a “contains” statement.
Step 5:
You then want to join all the individual pieces into one long string that will look like ^/laptops/|^/hand-bags/|… etc
The most important character to include is the pipe (|). This is what separates the product categories.
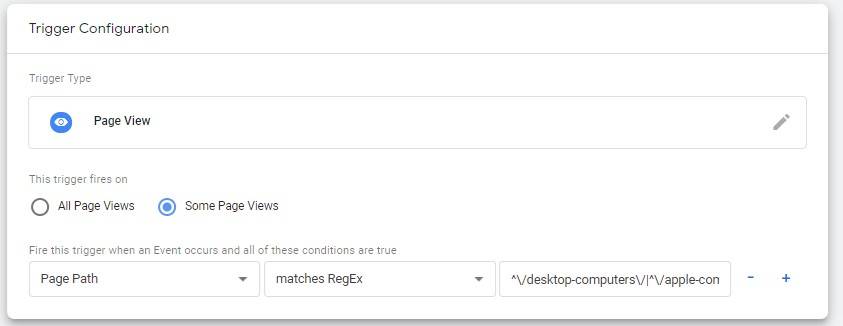
The next steps are done in Google Tag Manager, in the trigger setup for your tag.
Step 1:
The trigger type that you’re wanting to use is the Page View trigger.
Step 2:
Select Some Page Views
Step 3:
Use the dropdown options to select Page Path and matching RegEx in your trigger settings.
Copy your long string of product categories into the text box, and remove the final pipe (|) from the string.
Your final trigger setup should look similar to this:
Step 4:
Test, test, test. Make sure that your tag isn’t firing on the product category page but is firing on all the product pages in that particular category.
If you have recently been thrown into the deep end and have to figure out hacks and tips for Google Tag Manager, I hope this has helped you develop some very useful skills to help speed up the implementation of Google Tag Manager.
I would also like to leave you with a bonus hack and tip.
If your tag isn’t firing after checking it a thousand times, consider hitting the submit button and refreshing all the pages. If that still doesn’t work, delete the tag and trigger all together and recreate it. In my experience, Google Tag Manager sometimes has a little wobble and doesn’t work unless you start again. This particularly happens after adapting a number of tags in the container.
[/et_pb_text][/et_pb_column][/et_pb_row][/et_pb_section]


